Notice
Recent Posts
Recent Comments
Link
| 일 | 월 | 화 | 수 | 목 | 금 | 토 |
|---|---|---|---|---|---|---|
| 1 | ||||||
| 2 | 3 | 4 | 5 | 6 | 7 | 8 |
| 9 | 10 | 11 | 12 | 13 | 14 | 15 |
| 16 | 17 | 18 | 19 | 20 | 21 | 22 |
| 23 | 24 | 25 | 26 | 27 | 28 | 29 |
| 30 |
Tags
- 전역설치
- 변수
- Sequelize
- 우분투
- 일반유저
- 리액트
- 시퀄라이즈
- 벨로포터
- 머클루트
- wsl
- immer
- 설치
- 환경변수
- 깃허브
- Docker
- 노드
- 리액트를 다루는 기술
- wget
- npm
- 리눅스
- 자바스크립트
- 이더리움
- 쉘스크립트
- 머클트리
- node.js 교과서 따라하기
- 블록체인
- 라우터
- centos
- MariaDB
- 솔리디티
Archives
- Today
- Total
코드코코
210924 웹소켓사용하여 채팅구현하기 본문
*웹소켓 : 실시간 양방향 통신지원
1. soket.io
-soket.io모듈의 메서드
-on: 소켓 이벤드 연결
-emit: 소켓 이벤트를 발생
2. 소켓통신종류
-public : 자신을 포함한 모든 클라이언트에 데이터를 전달
-broadcast:자신을 제외한 모든 클라이언트에 데이터를 전달
-private : 특정 클라이언트에 데이터를 전달
-----------------------------------------------------------------------------------------------------------------------------------
1. npm i socket.io@1 설치
- socket.io로 설치 안한 이유는 1.7.4 버전을 사용하기 위해서
- 호환성에대한 이유로 최신버전 사용안함.
2. html 작성
<!DOCTYPE html>
<html lang="ko">

<head>
    <meta charset="UTF-8">
    <meta http-equiv="X-UA-Compatible" content="IE=edge">
    <meta name="viewport" content="width=device-width, initial-scale=1.0">
    <title>Document</title>
    <script
      src="https://code.jquery.com/jquery-3.6.0.js"
      integrity="sha256-H+K7U5CnXl1h5ywQfKtSj8PCmoN9aaq30gDh27Xc0jk="
      crossorigin="anonymous"></script>
    <script src="/socket.io/socket.io.js"></script>

    <script>
        //html문서가 로드가 되면 변수선언
        $(document).ready(() => {
            const socket = io.connect();
            socket.on('message', (data) => {
                //추가할 문자열
                let output = '';
                output += '<li>';
                output += '       <h3>' + data.name + '</h3>';
                output += '       <p>' + data.message + '</p>';
                output += '       <p>' + data.date + '</p>';
                output += '</li>';
                //문서 객체 추가
                $(output).prependTo('#content')
                //$('#content').listview('refresh');
            });
            $('button').click(() => {

                socket.emit('message', {
                    name: $('#name').val(),
                    message: $('#message').val(),
                    date: new Date().toUTCString(),
                });
            });
        });

    </script>
</head>

<body>
    <h1>이야기공간</h1>
    <p>노드와 함께하는 채팅</p>
    <hr>
    <input id="name">
    <input id="message">
    <button>전송</button>
    <ul id="content"></ul>
</body>

</html>
3. app.js 작성
const http = require('http');
const fs = require('fs');
const socketio = require('socket.io');

const server = http.createServer((req, res) => {
    fs.readFile('Page.html', (error, data) => {
        res.writeHead(200, { 'Content-Type': 'text/html' });
        res.end(data);
    });
})

    .listen(3000, () => {
        console.log('3000번 포트 대기중');
    });


//소켓서버를 생성하고 실행
const io = socketio.listen(server);

//소켓서버 생성 후 에 이벤트연결
//connection->클라이언트가 웹 소켓 서버에 접속할 때 발생
io.sockets.on('connection', (socket) => {
    socket.on('message', (data) => {
    	//public : 자신을 포함한 모든 클라이언트에 데이터 전달
        io.sockets.emit('message', data);
    })
})
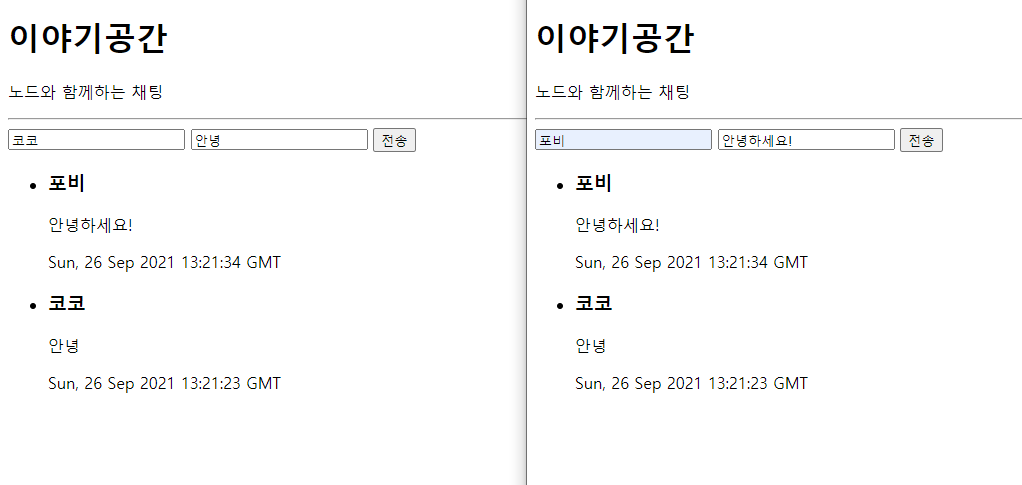
4. 결과물 : 창을 2개 열어서 확인해 보니 아래와 같이 출력됨!

'기록 > 수강내용' 카테고리의 다른 글
| [리액트] 라우터 적용하기 (0) | 2021.10.26 |
|---|---|
| [리액트] 프로퍼티 Props (0) | 2021.10.20 |
| [리액트] JSX 와 컴포넌트 (0) | 2021.10.20 |
| 210923 웹에서 데이터 수정 삽입 삭제 구현하기 (0) | 2021.09.23 |

