Notice
Recent Posts
Recent Comments
Link
| 일 | 월 | 화 | 수 | 목 | 금 | 토 |
|---|---|---|---|---|---|---|
| 1 | ||||||
| 2 | 3 | 4 | 5 | 6 | 7 | 8 |
| 9 | 10 | 11 | 12 | 13 | 14 | 15 |
| 16 | 17 | 18 | 19 | 20 | 21 | 22 |
| 23 | 24 | 25 | 26 | 27 | 28 | 29 |
| 30 |
Tags
- 일반유저
- MariaDB
- node.js 교과서 따라하기
- 깃허브
- 솔리디티
- 자바스크립트
- 이더리움
- 라우터
- Docker
- 노드
- 설치
- 전역설치
- 머클루트
- 리액트를 다루는 기술
- 환경변수
- 시퀄라이즈
- 우분투
- 변수
- wget
- Sequelize
- 벨로포터
- centos
- npm
- 리액트
- immer
- 블록체인
- 리눅스
- wsl
- 머클트리
- 쉘스크립트
Archives
- Today
- Total
코드코코
[리눅스] ubuntu에 MariaDB 설치하기 // ERROR 2002 (HY000): Can't connect to local MySQL server through socket '/var/run/mysqld/mysqld.sock' (2) 본문
기록/리눅스
[리눅스] ubuntu에 MariaDB 설치하기 // ERROR 2002 (HY000): Can't connect to local MySQL server through socket '/var/run/mysqld/mysqld.sock' (2)
코드코코 2021. 12. 13. 21:530. SuperUser 로 전환하기
sudo su
1. 레퍼지토리에서 업데이트 패키지가 있는지 체크하고, 설치된 패키지를 업데이트 하기
sudo apt update && sudo apt-get -y upgrade
root@DESKTOP-RJ31OF5:/home/ubuntu# sudo apt update && sudo apt-get -y upgrade
2. mariaDB를 설치
sudo apt-get install -y mariadb-server
root@DESKTOP-RJ31OF5:/home/ubuntu# sudo apt-get install -y mariadb-server
3. mariaDB 접속하기
mysql -u root -p
root@DESKTOP-RJ31OF5:/home/ubuntu# mysql -u root -p
Enter password:
4. 에러맞이하기
아래와 같은 에러가 나온다
ERROR 2002 (HY000): Can't connect to local MySQL server through socket '/var/run/mysqld/mysqld.sock' (2)
root@DESKTOP-RJ31OF5:/home/ubuntu#
5. 에러 해결해보기
/etc/mysql/mariadb.conf.d 의 50-server.cnf 파일을 수정
root@DESKTOP-RJ31OF5:~# cd /etc/mysql/mariadb.conf.d/
root@DESKTOP-RJ31OF5:/etc/mysql/mariadb.conf.d# ls -la
total 12
drwxr-xr-x 1 root root 4096 Dec 13 21:08 .
drwxr-xr-x 1 root root 4096 Dec 13 21:08 ..
-rw-r--r-- 1 root root  733 Nov 21 09:08 50-client.cnf
-rw-r--r-- 1 root root  336 Nov 21 09:08 50-mysql-clients.cnf
-rw-r--r-- 1 root root 1032 Nov 21 09:08 50-mysqld_safe.cnf
-rw-r--r-- 1 root root 3940 Nov 21 09:08 50-server.cnf
root@DESKTOP-RJ31OF5:/etc/mysql/mariadb.conf.d# vi 50-server.cnf
위 의 순서대로 하면, 마지막에 창이 이렇게 바뀐다.

나의 경우에 윈도우에 이미 MySql를 설치하고 사용중이기 때문에, 이미 3306 포트를 이용중이다.
아래 Basic Settings 에 port를 3307로 바꾸고, 주석을 푼다 (#를 지운다)
vi 에디터에서는 i를 누르면 INSERT 모드로 바뀌고, 편집이 가능하다.
esc 를 눌러 INSERT 모드를 해제하고 :wq (저장후종료를 의미)로 에디터를 나와준다.
cat 50-server.cnf 를 이용하여 내용이 올바르게 수정되었는지 확인
root@DESKTOP-RJ31OF5:/etc/mysql/mariadb.conf.d# cat 50-server.cnf
#
# These groups are read by MariaDB server.
# Use it for options that only the server (but not clients) should see
#
# See the examples of server my.cnf files in /usr/share/mysql

# this is read by the standalone daemon and embedded servers
[server]

# this is only for the mysqld standalone daemon
[mysqld]

#
# * Basic Settings
#
user                    = mysql
pid-file                = /run/mysqld/mysqld.pid
socket                  = /run/mysqld/mysqld.sock
port                    = 3307
basedir                 = /usr
datadir                 = /var/lib/mysql
tmpdir                  = /tmp
lc-messages-dir         = /usr/share/mysql
#skip-external-locking

# Instead of skip-networking the default is now to listen only on
# localhost which is more compatible and is not less secure.
bind-address            = 127.0.0.1

... 중략
root@DESKTOP-RJ31OF5:/etc/mysql/mariadb.conf.d#
잘 수정 되었다.
6. 서버구동하기
sudo service mysql restart
root@DESKTOP-RJ31OF5:/home/ubuntu# sudo service mysql restart
 * Stopping MariaDB database server mysqld                                             [ OK ]
 * Starting MariaDB database server mysqld                                             [ OK ]
7. MariaDB 접속하기
mysql -u root -p
root@DESKTOP-RJ31OF5:/home/ubuntu# mysql -u root -p
Enter password:
Welcome to the MariaDB monitor.  Commands end with ; or \g.
Your MariaDB connection id is 51
Server version: 10.3.32-MariaDB-0ubuntu0.20.04.1 Ubuntu 20.04

Copyright (c) 2000, 2018, Oracle, MariaDB Corporation Ab and others.

Type 'help;' or '\h' for help. Type '\c' to clear the current input statement.

MariaDB [(none)]>
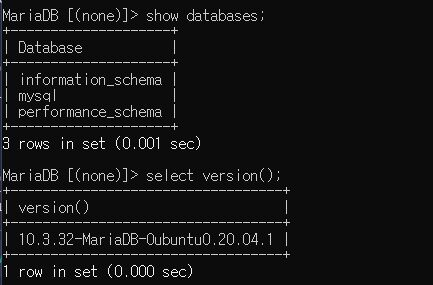
7. 확인하기

8. 시스템 시작시 서버 자동실행 설정해주기
root@DESKTOP-RJ31OF5:/home/ubuntu# systemctl enable mariadb'기록 > 리눅스' 카테고리의 다른 글
| [리눅스] 리눅스 패키지 (0) | 2021.12.15 |
|---|---|
| [리눅스] ubuntu 에서 MariaDB 재시작하기 (0) | 2021.12.14 |
| [리눅스] ubuntu에 nodejs 설치하기 (0) | 2021.12.13 |
| [리눅스] windows에 ubuntu 설치하기 (0) | 2021.12.13 |
| [리눅스] 리눅스 디렉토리 구조 (0) | 2021.12.13 |

